If you’ve ever priced out sturdy garden edging, you know how quickly a simple landscaping detail can get expensive. This project turns corrugated plastic yard signs and a single scrap item into heavy, ridged cement edging that looks surprisingly intentional once it’s set into the soil. I love projects like this because they borrow a little kitchen logic: use a humble form, control the texture, and let the material do the work.
This is a good weekend DIY for anyone who wants cleaner flower beds, a defined path edge, or a more polished vegetable garden without buying manufactured pavers. The corrugated plastic creates a naturally ribbed pattern in the cement, and the scrap piece acts as the form support, giving you a thick, substantial edge that can handle weather and regular garden use.
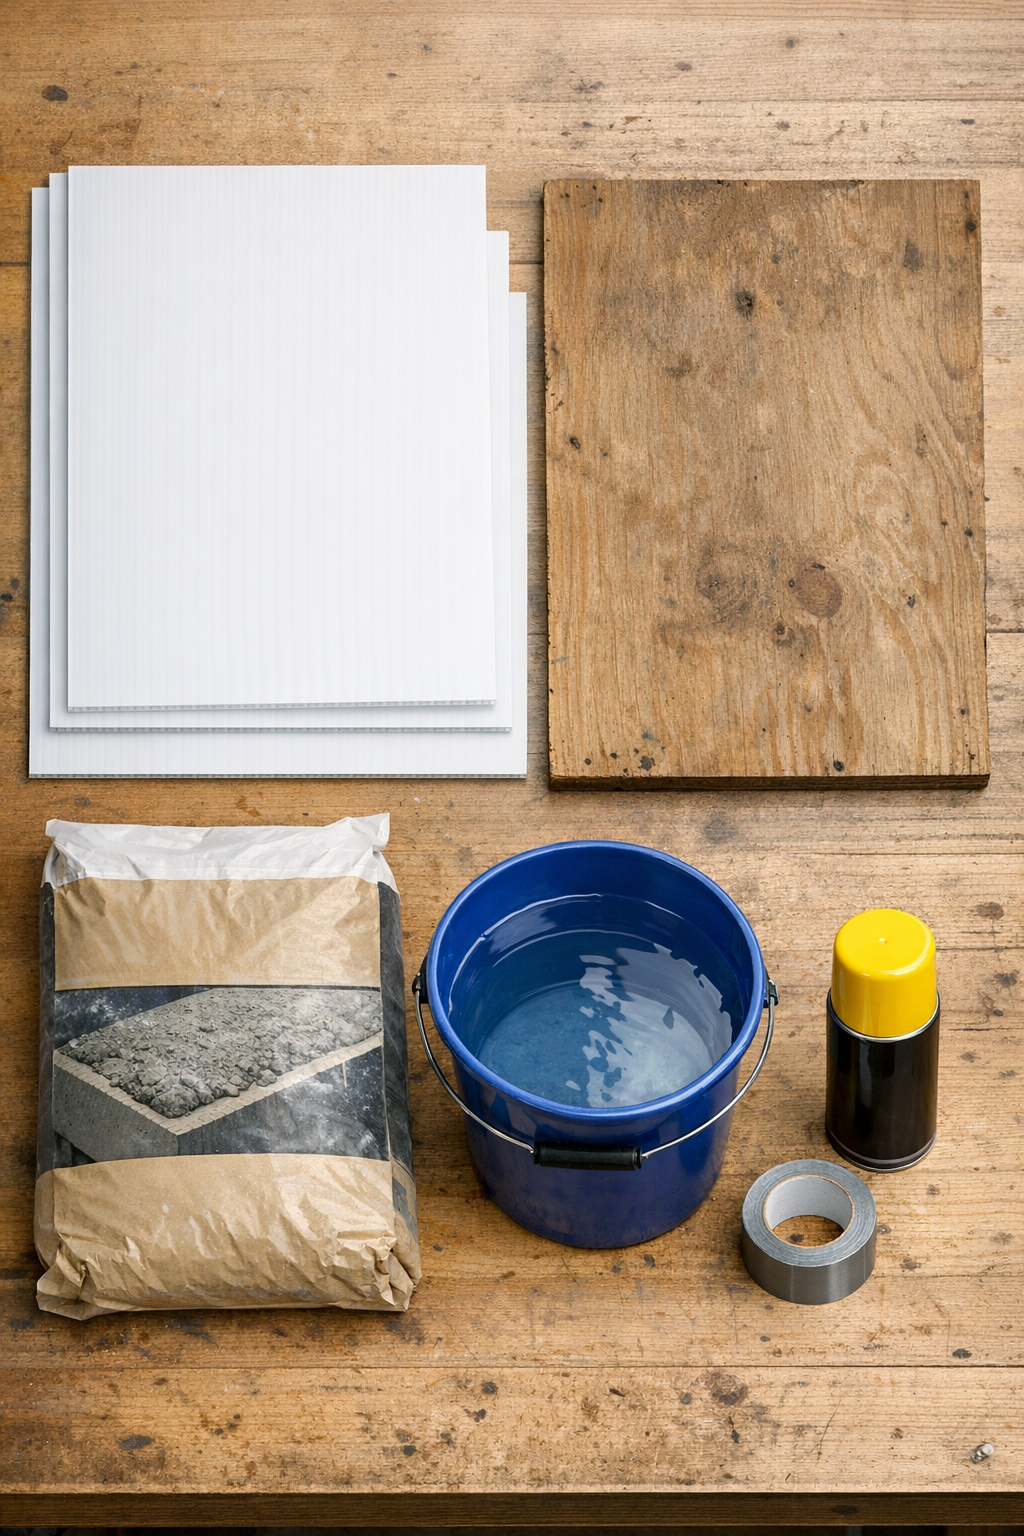
Materials
4 corrugated plastic yard signs, approximately 18 x 24 inches each
Instructions
1. Clean the yard signs and remove any metal stakes, dirt, or peeling film so the plastic sits flat and releases cleanly from the cement later.
2. Cut the corrugated plastic into long strips 6 inches tall; make enough strips to form the length of edging you want, with each finished section ideally 18 to 24 inches long for manageable weight.
3. Use the scrap plywood as a flat casting base, then tape the plastic strips into shallow open-top molds that are about 4 inches wide and 18 to 24 inches long, keeping the corrugation oriented so it will leave visible ridges on the finished edge.
4. Lightly coat the inside of each plastic mold with cooking spray or oil, and set the molds on the plywood so they won’t shift during the pour.
5. Mix the concrete with water a little at a time until it reaches a thick, spoonable consistency; it should hold its shape briefly when scooped, not run like pancake batter.
6. Pack the thick cement into the molds, pressing firmly into the corners and against the corrugated plastic so the ridge pattern transfers clearly.
7. Tap the plywood base and the outside of the molds several times to release trapped air, then smooth the top with a scrap board or trowel so each piece sits evenly in the garden.
8. Let the pieces set undisturbed for 24 hours, then carefully peel away the taped plastic forms and leave the edging to cure for another 5 to 7 days in a shaded spot, misting lightly if the weather is hot and dry.
9. Dig a shallow trench along your garden bed about 2 to 3 inches deep, stand the cement sections upright with the ridged face outward, and backfill the soil tightly around the base to lock them in place.
10. Check the alignment from end to end, adjust the height while the soil is still loose, and water the bed lightly to settle everything into place.

Variations & Tips
Longer runs: For a long border, make multiple matching sections instead of one continuous piece. Shorter sections are easier to demold, move, and replace if one ever cracks.
Curved beds: To follow a gentle curve, install shorter 12- to 16-inch sections and leave a very small gap between pieces. Once set in the soil, the curve reads cleanly from a distance.
Heavier edging: If you want more mass, make the molds 5 inches wide instead of 4 inches. I’ve found that extra thickness is especially useful near gravel paths or spots that get bumped by a mower.
Smoother finish: For a cleaner face, press a thin layer of finer cement mix into the mold before adding the main batch. It’s a bit like lining a cake pan well before pouring in the batter—the details come out sharper.
Color options: Concrete pigment can be mixed in if you want the edging to blend with brick, dark mulch, or stone. Earth tones tend to look the most natural in a Midwestern garden.
Crack prevention: Don’t rush demolding or full installation. Cement gains strength over time, and giving it a proper cure makes a noticeable difference in durability.
Drainage tip: Set the edging so the top sits just above the soil line rather than too high. It will define the bed without creating an awkward barrier for water or mulch.