There’s something deeply satisfying about growing potatoes where you can keep an eye on them every day, instead of tucking them away in a far corner of the garden and hoping for the best. This simple vertical potato growing tower uses cardboard tubes, mesh, and straw to make a tidy little planting space that fits beautifully in a small yard, along a fence, or beside a porch where the sun is good and steady.
I’m especially fond of projects like this because they make use of humble materials and old-fashioned garden sense. Around here, we’ve always believed you don’t need fancy systems to grow good food. If you’ve got a handful of seed potatoes, a sunny spot, and a willingness to stack things neatly, this is a practical little build that’s beginner-friendly and surprisingly productive.

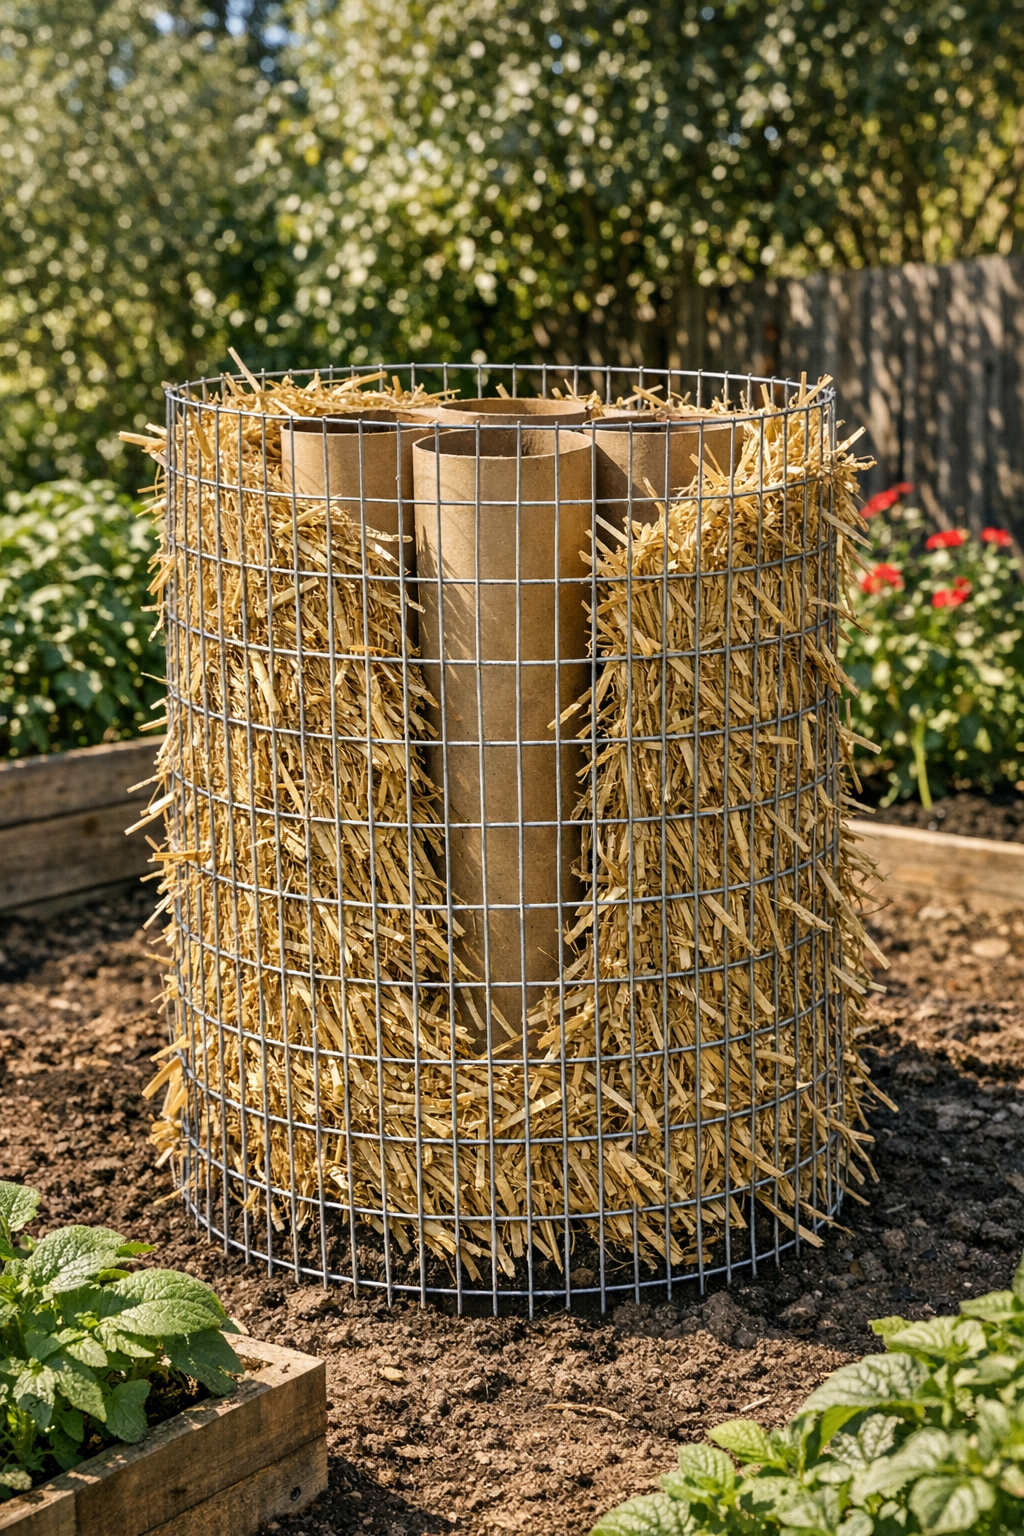
Materials
12 cardboard tubes, 12 inches long and 4 inches wide each
Instructions
1. Choose a sunny, level spot that gets at least 6 to 8 hours of light, and unroll the mesh flat on the ground with the 72-inch side running left to right.
2. Stand the 12 cardboard tubes upright in three rows of four, keeping them tightly grouped in a rectangle about 16 inches by 12 inches in the center of the mesh.
3. Pull the long sides of the mesh up around the tubes to form a cylinder or rounded rectangle, overlapping the ends by 3 to 4 inches so the tubes are held snugly inside.
4. Tuck and weave the cut ends of the mesh into the opposite side openings to secure the tower shape without adding extra materials, then press the base down so it sits steady on the soil.
5. Stuff loose straw into the gaps between the cardboard tubes and the mesh, creating an insulating outer wall about 2 to 3 inches thick all the way around.
6. Leave the centers of the cardboard tubes open so they act as individual planting pockets, and add a little extra straw at the bottom edge to help the tower hold its shape.
7. Set the tower in its final spot and press it gently into the ground so it won’t shift when filled and watered during the season.
8. Plant one seed potato piece in each cardboard tube, then fill each tube with garden soil from your planting area and water thoroughly so the cardboard softens and settles into place.
9. As the potatoes grow, keep adding soil or compost into each tube to cover the lower stems, and top off any slumping straw around the outside so the tower stays supported.
10. Water consistently, especially in hot weather, and harvest by pulling apart the softened tubes and mesh at the end of the season to reach the potatoes with very little digging.
Variations & Tips
For small spaces: Use 6 to 8 cardboard tubes instead of 12 and shorten the mesh length to make a narrower tower that fits beside a shed or on the sunny side of a raised bed.
For better stability: If your site is windy, place the tower where it has some shelter from a fence or wall, and make the base slightly wider rather than building upward too quickly.
On tube size: Sturdy cardboard mailing tubes last longer than thin paper towel tubes, and they hold their shape better once you begin watering.
For cleaner straw packing: Use dry, loose straw rather than hay, since hay tends to mat down and may carry more seeds than you want around your potatoes.
Planting tip: I like to use chitted seed potatoes with short, sturdy sprouts because they take off faster once tucked into warm spring soil.
Season-long care: Check the tower every few days in summer heat, because a vertical setup can dry out faster than a flat garden row.
Harvest tip: Don’t rush the harvest; wait until the tops die back so the potatoes have time to size up and the skins can firm nicely for storage.