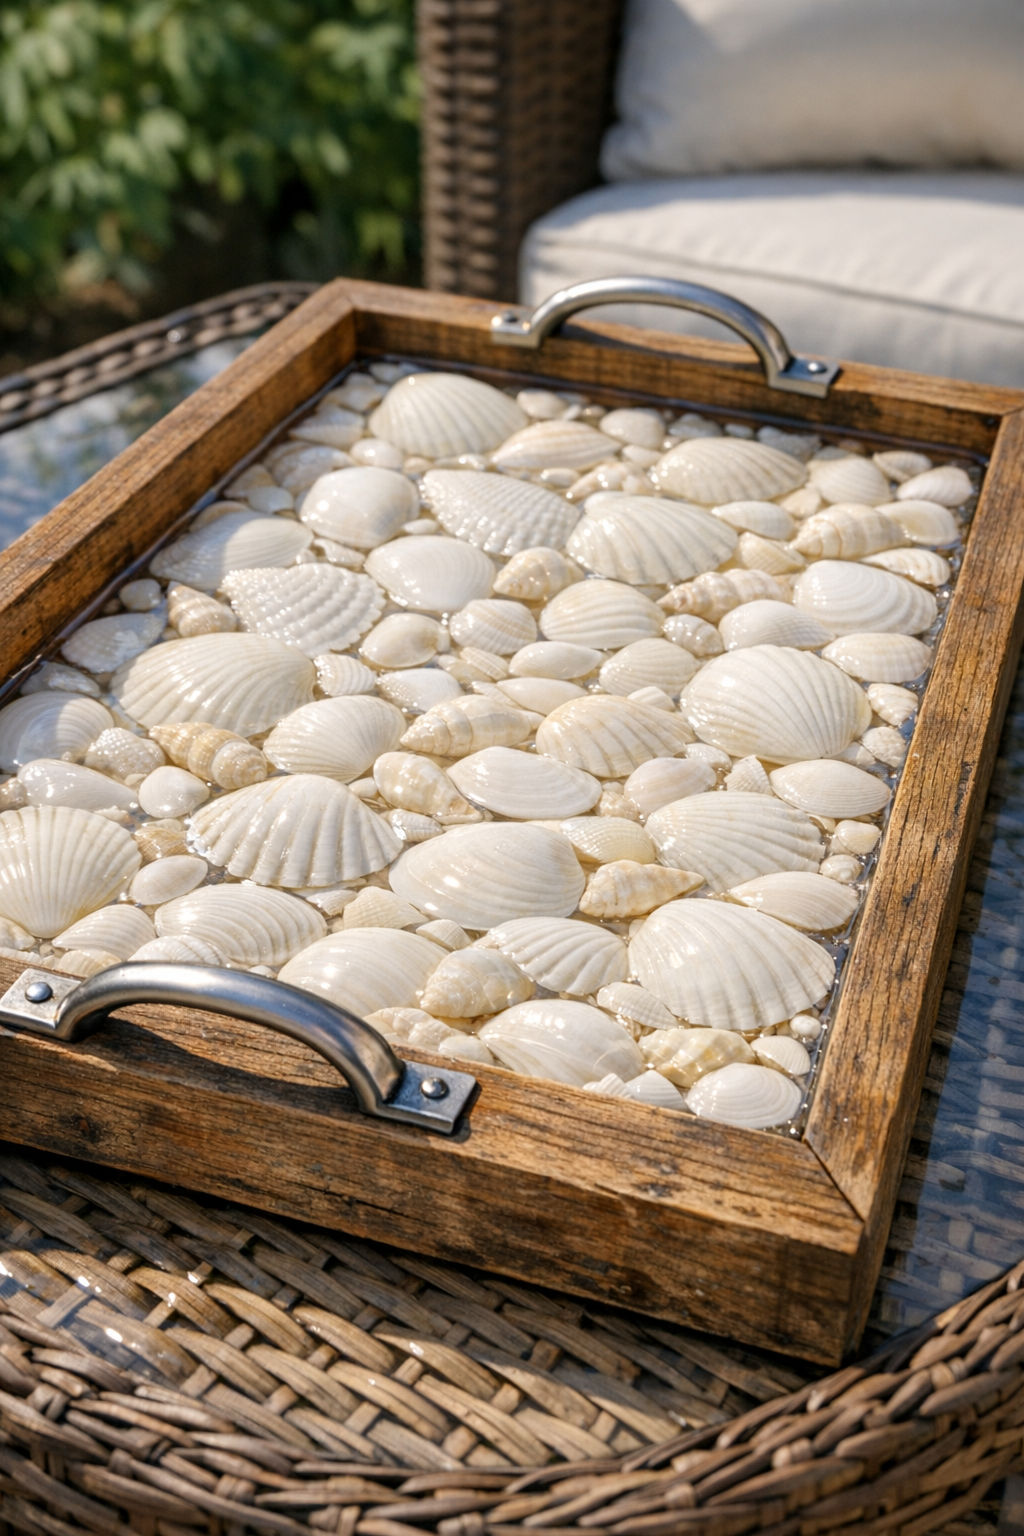
I love a project that feels equal parts practical and summery, and this outdoor serving tray does exactly that. By setting pressed white seashells inside a rustic wooden frame and sealing them under a clear coat of epoxy resin, you get a tray that looks custom-made for a patio table and stands up beautifully to outdoor entertaining. The finished surface is smooth, glossy, and easy to wipe clean, which makes it especially useful for drinks, appetizers, or even a simple coffee service outside.
As someone who spends plenty of time thinking about presentation in the kitchen, I’m always drawn to pieces that make serving feel a little more special. This is a good project for a confident beginner or any DIYer who can measure carefully and work patiently. The steps are straightforward, but the magic is in the setup: getting the shells arranged neatly, the frame sealed well, and the resin poured evenly.
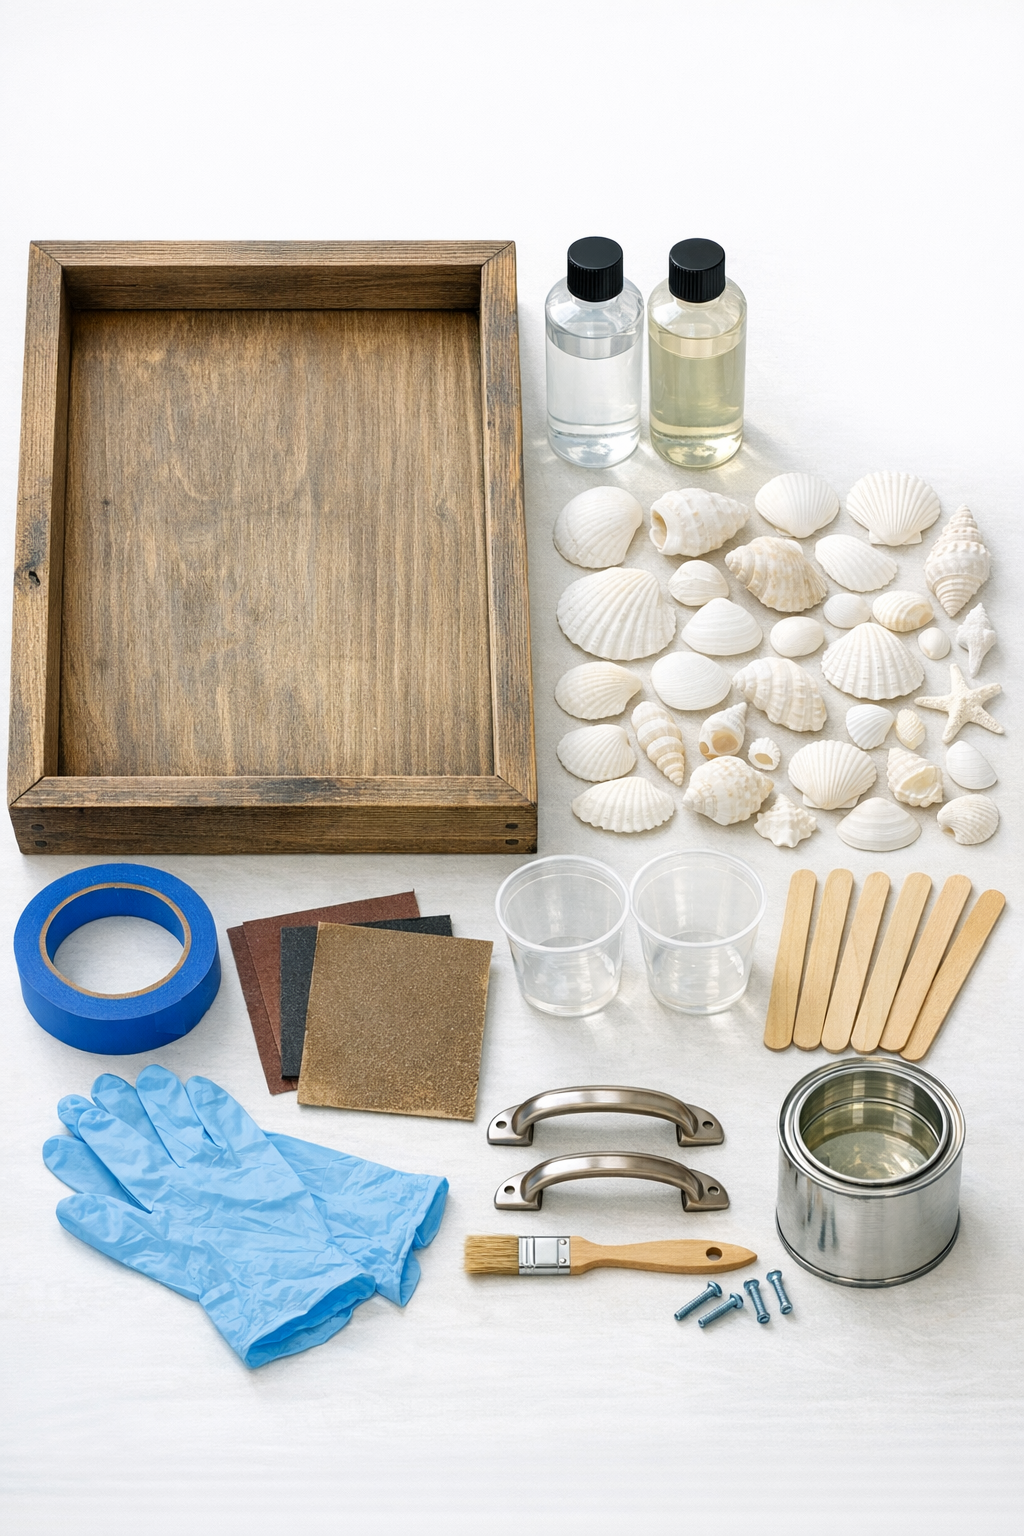
Materials
1 rustic rectangular wooden tray frame, approximately 16 x 12 inches with 2-inch sides
Instructions
1. Sand the wooden frame and plywood base with 120-grit sandpaper, then smooth everything with 220-grit. Wipe away all dust with a slightly damp paper towel and let the wood dry fully.
2. Attach the plywood base to the bottom of the wooden frame using wood glue, and add brad nails if you want extra strength. Check that the tray sits flat, then let the glue cure according to the manufacturer’s time.
3. Run painter’s tape along the outside bottom edges of the tray and seal any interior corner gaps with a thin bead of silicone caulk if needed. This extra step helps prevent resin leaks, which is worth the caution.
4. Brush a thin coat of clear outdoor sealer over the inside wood surfaces and base, then let it dry completely. Sealing first reduces bubbles coming from porous wood once the resin is poured.
5. Arrange the pressed white seashells across the tray base in a single even layer, overlapping slightly where needed for a full look. Once you’re happy with the layout, tack a few shells in place with tiny dots of glue so they don’t float when resin is added.
6. Put on gloves and mix the two-part epoxy resin in a clean cup according to the package ratio, stirring slowly for the full recommended time. Transfer it to a second cup and stir again to avoid unmixed streaks.
7. Pour the resin slowly over the seashells, starting in the center and moving outward until the shells are covered in an even layer. Use a stir stick to guide resin into corners and to nudge any trapped air pockets free.
8. Pass a small kitchen torch or heat gun briefly over the resin surface if you have one, or blow gently through a straw to pop surface bubbles. Leave the tray on a level surface, protected from dust, for the full curing time listed on the resin.
9. Remove the painter’s tape, sand off any drips on the underside, and wipe the tray clean with a little isopropyl alcohol on a paper towel. If you want a thicker glass-like finish, pour a second thin coat of resin after the first one cures.
10. Attach the tray handles to the short sides, predrilling holes if necessary to prevent splitting. Let everything sit another day before carrying drinks or serving food items on top.
Variations & Tips
Shell mix: If you want more texture, combine mostly flat white shells with a few tiny bits of sea glass or pale sand dollars. Just keep everything low-profile so the resin can cover it evenly.
Wood finish: You can stain the wooden frame before sealing it if you prefer a darker, more weathered look. I think driftwood tones are especially pretty with white shells.
Outdoor durability: This tray is great for patio use, but I still recommend storing it indoors when not in use. Epoxy holds up well, yet long stretches of direct sun can yellow many clear finishes over time.
Food safety: Use the tray for serving glasses, plates, and bowls rather than placing unwrapped food directly on the resin surface. That’s the easiest way to keep it looking polished and practical.
Leak prevention: Before mixing resin, always test your tray by setting it on newspaper and pouring in a little water. If nothing drips after a few minutes, you’re ready for the real pour.
Bubble control: Warm resin flows more smoothly than cold resin, so I like to let the sealed bottles sit in a bowl of warm water for 10 minutes first. Just dry the bottles well before opening them so no water gets into the mix.